John Della Costa, University of Florida
October 2, 2021
Astronomy is fun. But have you ever wanted to make it even better? Then why not try upgrading your 100 million dollar world class astronomical instrument! This may sound like an extremely difficult challenge that would require more than 30 people and many weeks of labor intensive work around the clock, and you’d be right! But with this handy DIY guide, you’ll be able to contribute in no time at all! So, follow along with this step-by-step tutorial and you’ll be observing the universe with your unrivaled, upgraded instrument faster than you can say, “Oh no, I only see 12 positioners but I plugged in 13. Please don’t make me take the whole petal apart again!”
Step 1: Get to the mountain
Remote mountaintops in dry locations are the best places to house telescopes. If you’re lucky, your amazing instrument will be located on the top of one in Southern Arizona. But first, you have to get to it! After your 4 hour plane ride in the lap of luxury, rent a vehicle and drive for 50 minutes until you get to the mountain road gate. Make sure to remember the combination for the lock (you still have the email with it, right?). Next, drive up the winding path to the summit. Try not to break any vertebrae as your neck becomes rubber from the occasional glimpses of the massive telescope your instrument desperately clings to. You’ve done it, you’re on the mountain!
Step 2: Get your safety briefing
Your safety briefing is one of the most important steps required for you to upgrade your instrument. When you’re on the mountain, there will likely be many creatures just waiting to kill you! So, be prepared, and never, ever, leave your food next to your bed as you sleep with the window open.
Step 2.5: Did you get food for your stay?
Did you really forget to get food for your 3 week stay on a mountain? Did you think you were going to subsist off of cacti and spiders? Now, drive back down the mountain, go to the grocery store another hour away, and drive back another hour again. Make sure you bought enough food to completely fill the freezer in the house so that you’ll have extra to throw out when you leave.
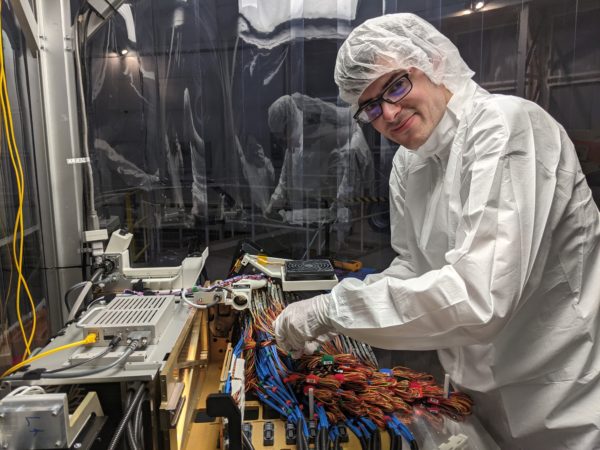
Step 3: Start disassembly of the first petal
By the time you get back to the dome after gluing your freezer shut, Petal 4 should be out of the telescope. But, before you start disassembly, make sure to test those pesky positioners with their mysterious ailment that nobody can understand. Now you’re ready to start disassembly! Just kidding, you have to take off the covers first. Make sure you use the correct tool or you might strip the… You stripped the screws, didn’t you? Well, that’s ok! Just make sure you have your hammer and drill close by so you can start going to town on your extremely fragile, multi-million dollar petal! But luckily, no other screws will be stripped on any other petal (foreshadowing). Now that you’ve spent many precious hours on this, you can start to disassemble the petal! Make sure as you pull out each positioner’s connector you really get your thumb and index finger in there. Don’t worry though, this definitely won’t leave you with nubs after doing it 5000 times… Wow, you’re fast! It only took you 3 hours of nonstop work! You should probably go home now and get some rest. Luckily your accommodations are only a 5 minute drive away (on the top of a mountain in complete darkness)!
Step 4: Start petal reassembly
Once the petal is completely taken apart, all 500 positioners are successfully unplugged, and all the transverse boards are out, you can get started on petal reassembly! Make sure not to snap any fibers, it’s not like they’re irreplaceable or anything. Finally, after two to three days of nonstop work, you’ll have your petal completely put back together. Now, just put it back in the telescope with that giant crane attached to the dome that lifts the 200 pound petal 30 feet into the air (seriously though, this part is terrifying to watch).
Step 5: Rinse and repeat!
Now all you have to do is repeat steps 3 and 4 seven more times (you’ll probably only be able to get 8 petals done during your 3 weeks on the mountain)!
Step 5.5: Take some time off
Make sure to take a day off here and there. Go for a hike, see some cacti (make sure to pick up their fruit with no hesitation, they can’t hurt you!), drive down the mountain and back up again, and enjoy the 110 degree weather (it’s a dry heat)!

Step 6: Make sure it’s not too easy
Be sure that Petal 6 has a lot of issues so that you have to take it apart and put it back together. Twice! But don’t worry, it’s great practice, and your thumbs will thank you later.
Step 7: Bask in the glory of an upgraded instrument
Now that you’ve completed the disassembly and reassembly of your world class multi-object spectrograph, you can start observing, again, and get back to deciphering the mysteries of the universe!
Step 7.5:
Wait, you’re telling me we have to test the instrument for weeks after reassembling it? Will we ever get to start observing again?
Well, while you wait, you can look back at the over 5000 pictures you took while you were on the mountain and think back at the amazing, once in a lifetime experience you had while helping to upgrade one of the best astronomical instruments on planet Earth, and remember all the skills you learned and all of the amazing people you met along the way.